Showing posts with label Christmas. Show all posts

Thursday, 27 December 2012

Christmas Dinner Leftovers

I hope everyone had a lovely Christmas day celebration.  Ours was quiet but filled with wonderful food, flowing drink and lots of puppy cuddles (we still had one left on Christmas day but we are now a two dog family).  And Santa stopped by too!

Chances are, like me, you have a fridge full of turkey dinner leftovers.  I love leftovers.  I'm sure I have mentioned this before.  I'm pretty sure I cook purely to have leftovers.  We toyed with the idea of an M&S Christmas dinner since there would only be three of us and it would take all the of stress out of Christmas day as all that needs to be done is a little maths to know when to put things in the oven and when to take them out (so only a little stressful - I hate maths).  All the trays and tins can be thrown away and there's very little cleanup.  But the downfall - no leftovers.  It's nice to just pile up a plate with last night's dinner but what I really like to do it create an entirely new dish.  Nothing fancy - just something a little different than the day before. 

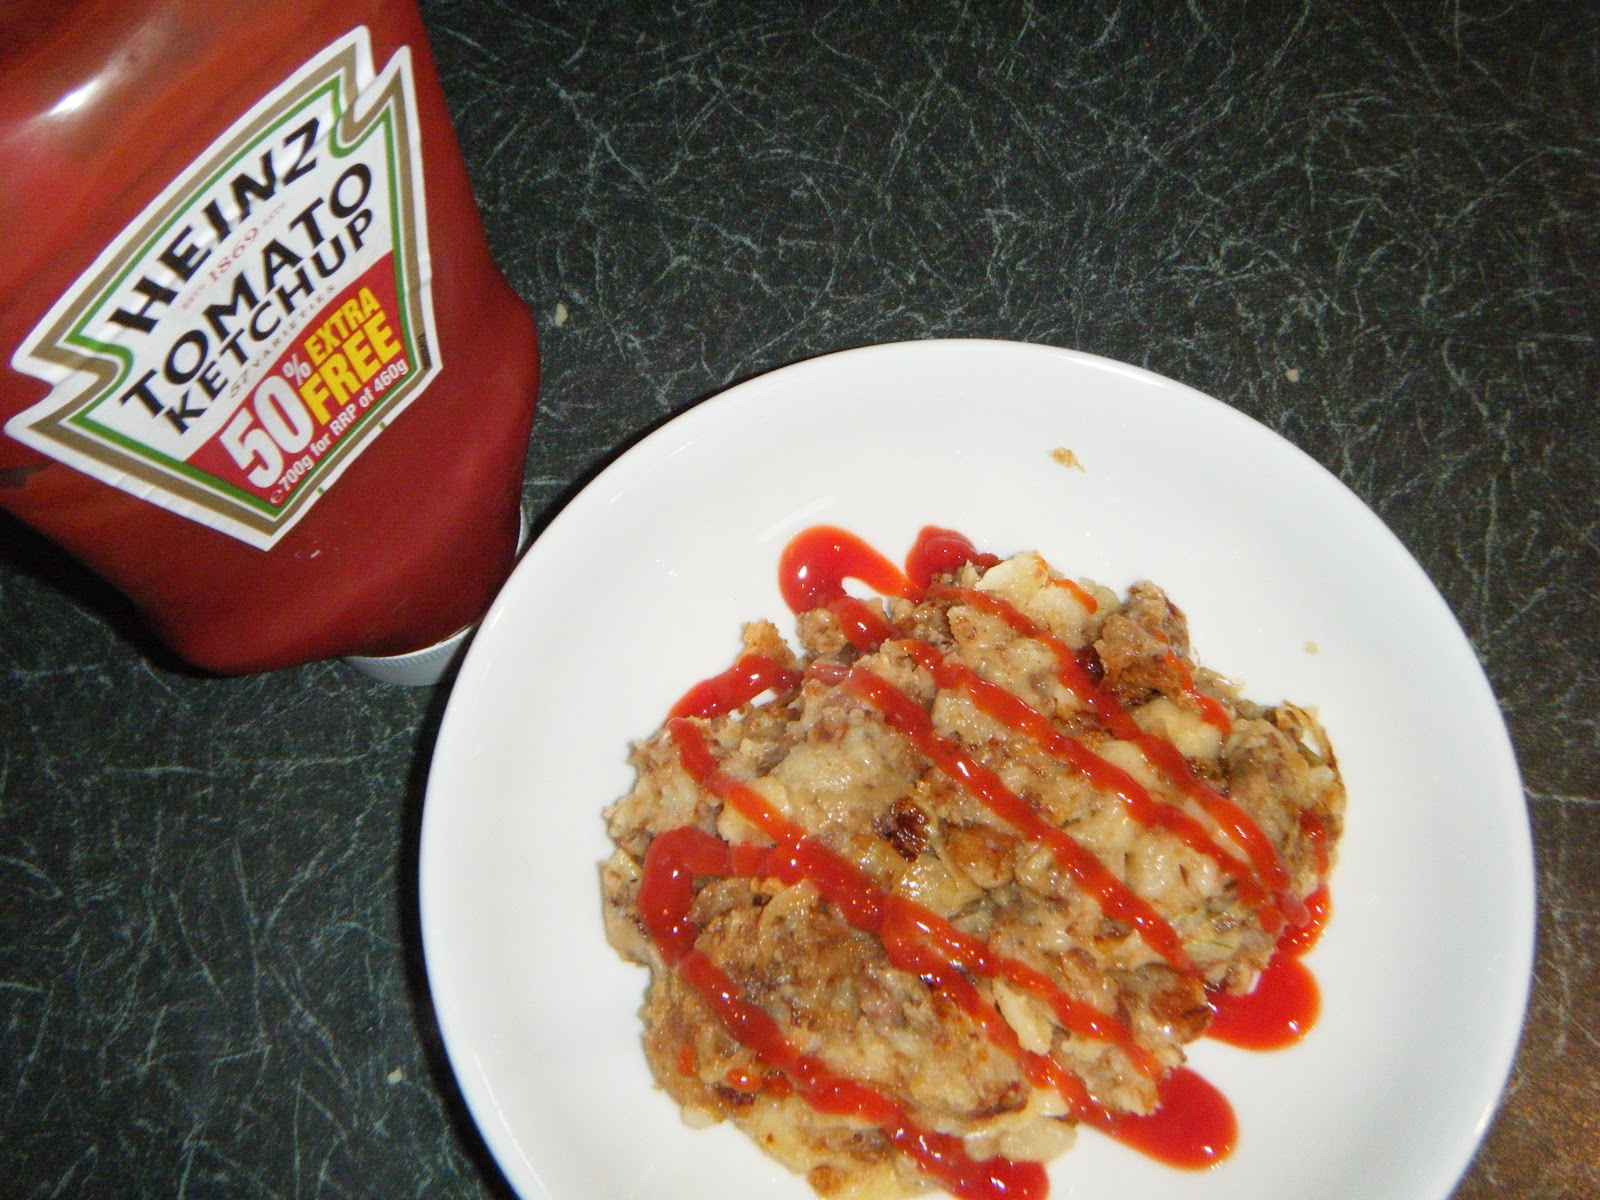
Sometimes I wonder if I'm blogging about something too simple - not interweb worthy (though there is A LOT of stuff out there that isn't quite web worthy so...) but if someone hadn't shown me then I couldn't show you.  My roommate at university introduced me to this fine mashed potato delight.  This is a perfect midnight snack. All that is required is leftover mash, a chopped onion and some grated cheese.  Then just fry the onion until browned, add the mash and fry that too until it gets brown and crispy and finally stir in the cheese just before serving.  I douse it in ketchup.  Perfectly comforting.  Though it doesn't pose well for photographs.


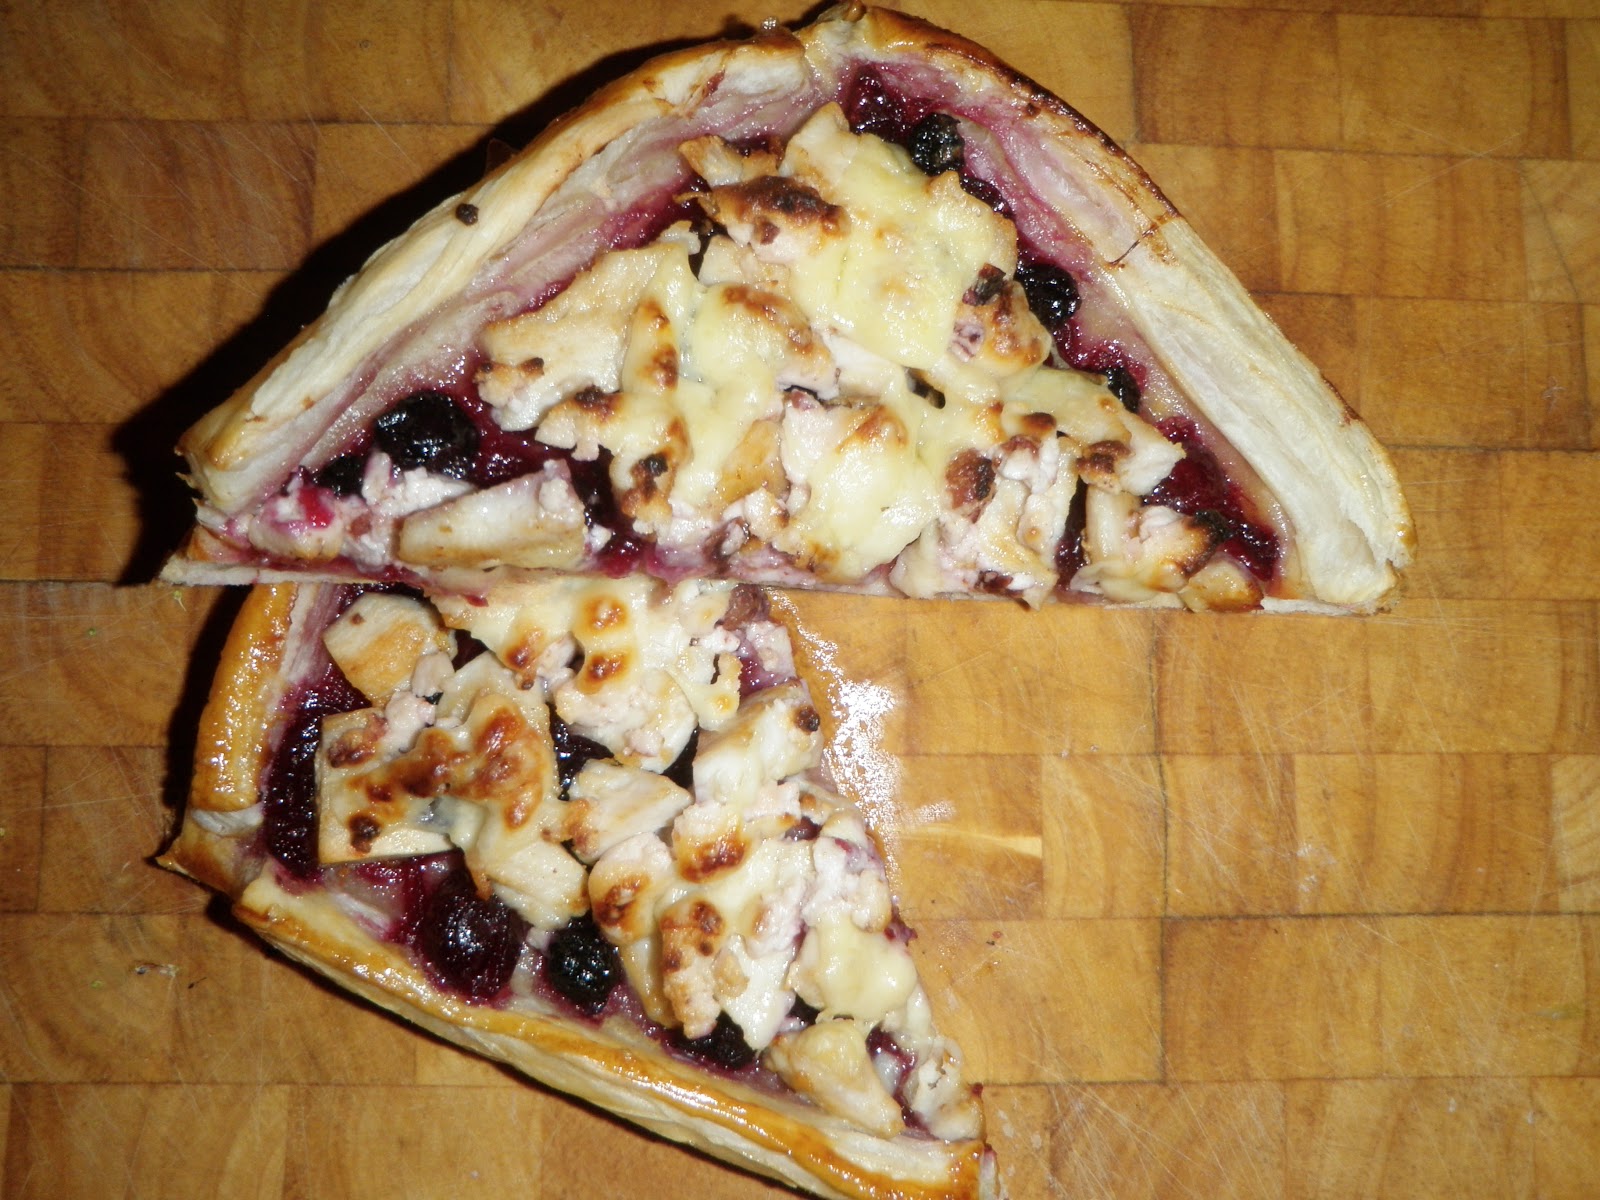
 I also whipped up a little quiche when some friends stopped by for lunch today.  A little sceptical when I first saw this in a Morrison's free magazine about a year ago because one of the ingredients is frozen chips but I gave it a go and was glad I did.  Easy and delicious - my favourite combination.  I would have used leftover roast potatoes but I had those with breakfast yesterday - mmm hashbrowns.

So, just layer the bottom of a bread tin with frozen chips (or chopped roast potatoes), sprinkle some chopped ham on top (or bacon or sausage), add some grated cheese and top the whole thing off with a mixture of beaten eggs, cream and spinach.  I baked it for about a half an hour at 200 degrees Celsius - until the topped had puffed out and was golden brown.  I used a wax paper liner in the bread tin to be able to pull the quiche easily from the tin and I sliced it once cooled slightly.Went down a treat with my 1 year old goddaughter, who gobbled up two slices, and everyone else enjoyed it as well.   


You might be thinking, wow that picture is so clear and in focus and wondering if I've stolen it off the web or something (or not).  But it is and it's mine.  And it didn't require any strategic flashlighting.  A little hint to what Santa brought me for Christmas.  I'll recap our holly-days tomorrow; what we ate, drank and even a little impromptu Boxing day shopping.  I know you're dying to know!  For now I'll get back to taking pictures of "nothing" as the husband puts it.  And well, these two.


Friday, 21 December 2012

The Last of the Christmas Baking

Hark! The Herald angels sing, ChloƩ is done with her baking!

Over the last few weeks, I have made 9 different varieties of Christmas goodness; some made with ease and others proving a little more difficult.  Starting my baking ahead of time was good in that I was able to take my time and even try a few new recipes that I wouldn't have tried if I were baking everything in one Great British Bake-off style night.  I was also able to squeeze in a tourtiere (French-Canadian meat pie) making session the other day and made 3 in a couple of hours (helps that I buy ready made pastry!).


A little OTT, Yeah you know me!
I took all of the cookies from the freezer last night and with a little solo assembly line going, made up a few tins for friends and family.  It's my favourite gift to give at Christmas and not everyone has time or enjoys baking as much as I do and, really, we can't eat all of that! (well we can, but we shouldn't)

Now there's just the Christmas dinner to think about.  We are currently watching Nigel Slater's 12 Tastes of Christmas and the husband has just asked if we can "have that".  "Have what?" I said.  "All of that" gesturing to the television.  It's something fancy, looks like brandy snaps and fruit.  He's teasing me (I hope) but I still don't know what to make for Christmas dinner.  I will probably get a turkey in the end but with only 2 of us I feel like I should tone it down slightly.  What is everyone making?  Pork roast, beef, turducken, tofurky or Chinese food??

These last two cookie recipes I'm going to share are easily done in about an hour.  They're great if you need to bulk out what you already have.  Same recipe just different fillers.


White Chocolate and Cranberry Cookies (adapted from All Recipes)

1/2 cup butter, softened 
1/2 cup packed brown sugar 
1/2 cup white sugar 
1 egg  
1 tablespoon Cointreau 
1 1/2 cups all-purpose flour 
1/2 teaspoon baking soda 
1 cup white chocolate chips 
1 cup dried cranberries

1. In a bowl, whisk flour and baking soda and set aside.
2. Cream butter in a large bowl and then blend in both sugars.  Beat in egg and Cointreau.  
3. Slowly add the flour mixture to the sugar mixture until fully incorporated.
4. Stir in white chocolate chips and dried cranberries.
5. Bake in a pre-heated oven (190°C) for 8-10 minutes (for a chewy cookie take out while still doughy). Allow to cool for 1 minute and transfer cookies to wire rack.

Change out 3 ingredients, follow the same steps and you get:
 

Chocolate Chunk and Walnut Cookies

1/2 cup butter, softened 
1/2 cup packed brown sugar 
1/2 cup white sugar 
1 egg  
1 tablespoon vanilla
1 1/2 cups all-purpose flour 
1/2 teaspoon baking soda 
1/2 cup chopped walnuts
1 cup chocolate chunks (I used a large bar, placed in a resealable bag and broken up with a hammer)

1. In a bowl, whisk flour and baking soda and set aside.
2. Cream butter in a large bowl and then blend in both sugars.  Beat in egg and vanilla.  
3. Slowly add the flour mixture to the sugar mixture until fully incorporated.
4. Stir in white chocolate chunks and walnuts.
5. Bake in a pre-heated oven (190°C) for 8-10 minutes (for a chewy cookie take out while still doughy). Allow to cool for 1 minute and transfer cookies to wire rack.

I hope you have all finished (or are nearly finished) shopping, baking and all around prepping for Christmas and ready to start relaxing and enjoying the festivities.  I attempted a bit of a shopping trip today - I should never have left the comfort of my laptop.  Online shopping forever!


Wednesday, 19 December 2012

It's Not Christmas Without Sugar Cookies

I love sugar cookies.  Actually, I should re-phrase that: I love decorating sugar cookies.  They are definitely not my favourite in the taste department.  Of course they taste great - there's just a long list of cookie loves ahead of these guys.  It's the decorating that really gets me going.  It doesn't take much.


I make them every year because out of all the Christmas baking they look the part the most with the festive shapes and all the colours.  I also really enjoy time set aside to decorate.  Last year, I had a terrible cold so I stayed home to "rest" (you'll have to strap me to my deathbed).  So probably after some light vaccuming and a few loads of laundry, I got my decorating on.  I had baked the cookies a day earlier and they were ready to be covered in sprinkles and glitter so I got everything ready and took it to the dinning table and began what would be a couple of hours of painting and sprinkling and icing the cookies.  W walked in and saw me surrounded by my creations and said "You need some kids!" (we're working it on people).  This is a fun activity to do with kids, sure, if you don't want them to look just right.  I'm kidding here - I love the handmade look and how each cookie looks different.


Every year, I've made them a little differently.  The recipe and shapes stay the same but the colours and sprinkles are changed up, mainly because not one supermarket seems to carry the same thing from year to year but also because I like to try out different styles.  One year, I went very traditional with greens and reds, another year was pastel colours and 'hundreds and thousands' and last year I found some cute snowflake sprinkles and red and green sugar.  This year I've gone for wintry with a white and silver theme and some blue glitter.


This was very much like the Toblerone shortbread adventure from last week.  A few slip ups and some cookie casualties (don't worry - I saved 'em!)  but I've made the mistakes so you don't have to.  When you think to yourself  "I'm sure I didn't line the cookie sheets with wax paper last year", think again and go and buy some wax paper.  Don't even try a few without it.  It won't work - they will stick like glue and break and you'll be forced to take 1 (or 6) for the team.  What did you have for dinner last night?  I had a half a dozen sugar cookies.


Handle the stars very carefully; a few were fully decorated before they decided to take the plunge. Face down.


My entire kitchen was covered in glitter and sprinkles and little silver balls.  And just for fun I threw some all over the counter.


The recipe has been scribbled down in my notebook for about 5 years (most likely given to me by my mother) with very clear instructions like mix in flour etc and divide in half, wrap, fridge, roll, cut, 1cm, 10 min but I'll try and be a bit more specific down below.  The decorating, however is recipe free and entirely up to the creator.  Go get yourself some kids and make some cookies!  ( I feel I need to be clear here - children you know, your own or some nieces and nephews will do but don't go rounding up the neighbourhood kids claiming you need them for a recipe -it won't go down well).


Sugar Cookies (adapted from my little blue notebook)

For the cookies
1 3/4 cups flour
pinch of salt
1/2 teaspoon baking powder
1/2 cup butter (softened)
3/4 cup granulated sugar
1 egg
1 teaspoon vanilla

Whisk flour, salt and baking powder in a bowl and set aside.  In another bowl, blend butter and sugar until smooth.  Add in egg and vanilla and mix together.  Slowly stir in flour mixture a little at a time until fully incorporated.  Divide dough in half and roll into large balls and flatten into a disk shape.  Wrap in cling film and set in the fridge for an hour.

Roll out on a lightly floured surface until 1 cm thick and cut with cookie cutters.  Line baking sheets with wax paper and place cookies about 2 cm apart.  Place in the fridge for about 10-15 minutes (this helps cookies retain their shape when baked).  

Bake in a pre-heated oven at 190 degrees Celsius for 8-10 minutes.  Edges will burn quickly so keep an eye on them.

For the icing
1 egg white
1 teaspoon lemon juice
1 1/2 cups icing sugar

With a hand mixer blend everything until smooth.  Cover the bowl with a dish towel as you mix to minimise the dust cloud that emerges.  Once cookies have cooled, use a small clean paintbrush to decorate.  Gently push the icing to the edges in a circular motion and decorate with sprinkles.  Alternatively, add food colouring to the icing or use a piping bag to draw designs on the cookies.

Monday, 17 December 2012

Handmade Christmas

My little terraced house reminds me every day how lucky I am.  I mean, firstly I have a roof over my head.  But secondly, when my house was built in the 1880's, people had very little.  Before the invention of indoor plumbing this house had two rooms upstairs and two rooms downstairs (commonly known as a "2 up 2 down" - clever).  Now, it includes a bathroom.  Also, ours was built with an extended little kitchen but most kitchens were in the back room.  Even when electricity was brought into the home, there were very few appliances that needed to be plugged in, hence the reason we have only two sockets in each room.  There are no closets or storage areas (apart from the attic) as people didn't have "stuff" to put in them.  Therefore, I think I am lucky because intelligent, creative people invented or discovered ways to help make our lives easier.  We can easily go out (or stay in and look to the world wide web) and purchase items we need or want and not have to make them ourselves.  We don't have to grow our own food, bake our own bread, shop daily because we don't have a refrigerator or hand wash our laundry (unless it's a silk blend). This frees up an incredible amount of time.  TIME.  How do you spend your time?  I know I don't spend mine wisely.  I think there's also a lot of pressure to do more in a given day because life has been made "easier". 

I have fallen victim to "Keeping Up with the Jones"; needing the latest gizmo or gadgets or stylish piece of clothing, only to no longer use it or wear it a short time later.  We, as a society, have too much "stuff".  Watching various talk shows these past few weeks I have heard how some people spend an obscene amount of money at Christmastime.  Many of us have lost sight of what is important.  I want to live more simply.  Have only the things that are truly beautiful and necessary in the home.  Making time to appreciate the little things.

A friend of ours stopped by on the weekend and noticed that I hadn't gone overboard this year with the decorating which says something because the house is still pretty well decorated; from every mantel to the holiday kitchen mat, to the Christmas pictures in frames and wreaths on the doors and windows.  I have to admit, I wanted to curb the decorating a little and left a few items in the boxes.  I also vowed not to buy anything new and make do with what I have already because let's face it, I already have A LOT of Christmas stuff.  When the 6th plastic bin came down from the loft I realised it was all a bit much!

I've been meaning to do more for others.  Last week I purchased two big bags of food to donate to the food drive at my local Tesco and this week I will be purchasing a toy for the toy drive.  I need to remember to do more throughout the year because people are not only hungry at Christmas.  It is important to keep things in perspective, appreciate the little things (and sometimes big things) and be thankful for what we have - because someday it could all be gone.

In an effort to make do with what I have I created a few Christmas decorations for very little or no money, mostly using things I already had (and a little printer ink).

The first is this shadow box frame that usually hangs in our bathroom with a flower print inside.  I found an image I liked on the interweb and printed as a square image.  It didn't quite fit so I backed it with some brown parcel paper.  I then tipped in as many ornaments that would fit and used a little piece of berry garland to round off the corner.  Simple, easy, took about 10 minutes.  I think I spent longer looking for an image on the net (using my time wisely you see).


Earlier this autumn I created a gallery wall at the top of our stairs.  I love it because I can switch out the pictures and change with the seasons.  Again, I just searched the interweb, printed my favourites and popped them into the frames.  A tip from my super saver husband - put the print outs in a folder to use next year so you stop wasting all the printer ink!  You can also insert old Christmas cards, like the image of the reindeer.  Printer ink, saved!


And last year I made this tablecloth.  I couldn't find one I liked enough to spend 20 pounds on so I bought 2 metres of material for 5 pounds and made my own.  If you've never sewn, start (I mean, only if you want to).  It's so easy to make simple and beautiful items and so much cheaper than store bought, and you get EXACTLY what you want.


Are you making anything this Christmas?  Handmade decorations or gifts?  Will you be sticking to your budget or blowing it all?  


Friday, 14 December 2012

Toblerone Shortbread: A Twelve Step Program

The cafe at my university sold ginormous shortbread cookies with a full piece of Toblerone in the centre.  Absolute heaven!  Kept me going during those 3 hour night lectures.  I haven't seen them anywhere else and always wanted to make my own.  A quick search on "The Pinterest" tells me I'm not the only one - though I didn't see any that were made with a full size Toblerone.  Probably due to the insane amount of sugar and calories in one little bite!  So I too went the mini Toblerone route since having bite sized Christmas cookies are great for a (somewhat) guilt free biscuit buffet.


Step 1 - Get ingredients ready.


Step 2 - Beat butter and sugar and then stir in flour mixture.


Step 3 - When shortbread turns out really crumbly, watch video from The Joy of Baking website (which is where you can find the recipe I used for shortbread) to see where you went wrong and shout "HALF a cup of sugar? What? Really?!"  Then re-read recipe to find out - yes indeed, half a cup of sugar NOT 1 cup.

Step 4 - Run down to Tesco to buy more butter.  I bought 6 because they were on sale and I'm bound to need more at some point.  This won't be the only mistake.

Step 5 - Get ingredients ready (again) and measure out HALF a cup of sugar.


Step 6 - Follow instructions carefully and make sure butter is smooth.


Step 7 - Watch as the dough goes crumbly (again) and cry a little on the inside.

Step 8 -  Get a brain wave (they sometimes happen, infrequently yes, but they do) and place the crumbly dough in a re-sealable bag and add little water.  Gently smoosh everything around in the bag until the dough looks more like the dough in the video.  Form dough into a ball, place in plastic wrap and flatten into a disk shape.  Refrigerate for an hour or overnight because you're going out for dinner and you can't spend all your time baking in the kitchen.  Note the difference:


Step 9 - Roll out dough and cut into shapes using a cookie cutter.  Halfway through, when your black jeans are covered in flour, remember to put on your apron (this should really be step 1).


Step 10 - Taste test Toblerone triangle.  If determined to be of good quality (it might take a couple to be sure) place one triangle in the centre of each cookie, place on a baking tray and stick in the fridge for 15 minutes.


Step 11 - Bake in the oven while crossing your fingers that they taste okay when done.

Step 12 - Give yourself a good ol' pat on the back when they come out looking  beautiful and tasting absolutely fantastic.  Pat, pat, pat.


Thursday, 13 December 2012

Peanut Butter Cookies

All aboard the baking train.  Woo woo - I've been busy today.  I'll start with a favourite - ah, who am I kidding, they're all favourites!

When I was back in Canada, I picked up a large jar of Kraft peanut butter, among other Canadian favourites.  And although you can use any peanut butter for this recipe, for me, this is the best.  These cookies remind me of our school packed lunches as children, as my mom used to bake them for us quite a lot.  Not traditionally a Christmas cookie per say, I do like to add them to the collection purely for the memories.

Another oldie but a goodie from the mom (adapted from Better Homes and Gardens, no doubt) I give you:
 
Peanut Butter Cookies 

3/4 cup butter (room temperature)
1/2 cup brown sugar (lightly packed)
1/2 granulated sugar
1 large egg
1 teaspoon vanilla
3/4 cup peanut butter
2 cups flour
1/2 teaspoon baking soda
1/4 teaspoon salt

In a large bowl, beat butter for about 1 minute.  Add both sugars and cream together until smooth (it goes crumbly before it gets smooth).  Beat in vanilla, egg and peanut butter.  In another bowl, whisk together the flour, baking soda and salt.  Slowly stir in the flour mixture until incorporated.

Roll into balls (I weighed them at 20 grams each) and coat with white sugar.  Place on a baking tray about 2 cm apart and press with a fork.  Bake for 8-10 minutes at 180 degrees Celsius.

Makes approximately 3 1/2 dozen cookies.


So, tell me - what do you include in you Christmas baking? Stick to the same things every year or switch it up?

Wednesday, 12 December 2012

Cranberry Blueberry Chutney/Relish/Jam

I would love to be getting on with my Christmas baking but with the puppies, I'm finding it very difficult to get anything done!  Yes, I'm wearing pyjamas and it's midday.  I could put them in their crate but then I wouldn't get to cuddle them and they're so cute and widdle and snuggly wuggly (insert more baby talk here).  I'm one more Facebook mobile upload away from being the crazy dog lady (what? I'm already there?!)


So food for thought - and this actually made me go "hmm" - What makes a chutney, chutney?  A jam, jam?  And a relish, relish?  Research I might take on this afternoon while confined to puppy cuddles but I thought I could spur a little discussion on here.

On Monday, I made a quick cranberry sauce to accompany an orange chocolate mousse.  Having only used a little bit, I decided to turn the rest into a hmmm, chutney? relish? jam?  Maybe it depends on how it's put to use?  I made a tart with it but also had a little on crackers.  It would be delicious on toast and a great sauce for turkey (oh no, is "sauce" now in the mix?).


Chicken and Cranberry Goat's Cheese Tart


Cranberry and Blueberry Chutney/Relish/Jam or Sauce

1 cup fresh cranberries
1 cup granulated sugar
1/2 cup frozen blueberries 
1/4 cup marmalade
1/4 cup water
1 teaspoon cinnamon
1 teaspoon ground ginger

Bring cranberries, sugar and water to a boil.  Stir in marmalade and allow sauce (relish, chutney, jam?) to simmer for about 10 minutes.  Add blueberries and spices and reduce until when the bottom of the pan is scraped with a wooden spoon the sauce (relish, chutney, jam?) divides in two and the pan is visible for a short while.  Transfer to a container to cool and serve with turkey, chicken, crackers, on toast, on pastry, with sausage, and anything else that might go well with it.  The sweet, tarty flavour is a great contrast to a strong cheese and I love the sweet and savoury combo.

So, where do you stand on the chutney, relish, jam debate?


Monday, 10 December 2012

Orange and Cranberry Chocolate Mousse

Last week I received a little request from a friend.  Could I write about the chocolate mousse she'd had at my house because she wanted to make it over the holidays.  I had made a simple (like 2 ingredient simple) hazelnut chocolate mousse for her but since she wanted to make it over the Christmas holidays, I thought I would Chrismasfy - Christmassify - Chris... ugh make it taste like Christmas?


Tesco is selling their own version of various flavoured chocolate spread so last week I picked up the orange flavour.  It's like a smooth Terry's Chocolate Orange.  Very dangerous because I could eat it by the spoonful.   I haven't.  Yet.

I thought it might go nicely paired with cranberries in some way so I bought some fresh ones and got them on the stove.  Very simple - I put equal parts cranberries and sugar (about 150 grams), a spoonful of marmalade and a splash of water into a pot and brought it to a boil.  Once the cranberries began to split, I turned the gas down and simmered for about 10 minutes.  In the meantime, I started on the mousse.  Last time I made this I melted the chocolate spread in the microwave, whipped the cream and then folded both together.  This time I tried blending both ingredients in a bowl, and so I put a half cup of orange flavoured chocolate spread and a cup of whipping cream and blended!  Worked like a charm!  When the cranberries were ready, I scooped out a small amount and allowed it to cool before putting a little in the bottom of each glass, then poured the chocolate mousse on top.  Allow it to chill for at least four hours or overnight.


I would have garnished this with a slice of chocolate orange but then I would have had to eat it all so I went with fresh.  You could use candied orange slices too.  I used martini glasses but shot glasses would work well to include this in a little dessert buffet.


The garland in the photo should tell you that I have spent the last couple of days turning my house into Santa's Grotto.  And everytime I think I've finished, I find something else to sprinkle a little Christmas magic on ie: tinsel and glitter.  Better get cracking on the rest of that baking!

Friday, 7 December 2012

Red Velvet Whoopie Pies with Mint Buttercream

A few Christmases ago, I received a book about Whoopie Pies.  I had no idea what they were but they looked delicious; sweet sweet frosting sandwiched between two fluffy little cakes (there are savoury ones too but I'm all for the sugar baby).  I love cupcakes but my favourite part is the frosting, so the cake to frosting ratio on these little pretties are just perfect!  I've made them a few times, usually sticking to vanilla.  There are so many flavours to mix and match within this book that I can get a little overwhelmed and indecisive.  Also, some of the ingredients can sometimes be hard to get a hold of.  Marshmallow fluff is used in a lot of the recipes and I have only ever come across this at a little trolley in the mall selling American goods like Poptarts at 5 quid a box.  No thanks!  Today, however, I found two things that I have been searching for over the years (why I never thought to ask before, who knows).  Pumpkin in a tin? Check.  Cocoa powder? Check check.  I had no idea it was in the drinking chocolate aisle!  Although W did and gave me the dumbest look when I told him of my find.  There's no holding me back from recipes containing cocoa now and I can make pumpkin pie anytime of the year (I won't, but I can!)


So today, when I craved a Christmassy cupcake, I remembered my whoopie pie book and having access to cocoa meant my baking was no longer limited.  Bring on red velvet.  I paired it with a mint buttercream for a candy cane flavour.  I've already had 2 (ok fine 3) as an appetiser before dinner.

Here' my recipe adapted from Whoopie Pies by Sarah Billingsley and Amy Treadwell


Red Velvet Whoopie Pies with a Mint Buttercream

Whoopie Pies
1 cup flour
1/4 cup cocoa
1/2 teaspoon baking powder
1/2 teaspoon baking soda
1/2 cup butter
1/4 cup light brown sugar, packed
1/2 cup white sugar
1 egg
1 teaspoon vanilla
1 teaspoon malt vinegar
1/4 cup buttermilk (I make this by adding a squeeze of lemon into the milk and letting it sit for a minute or so)
4 teaspoons of red food colouring
pinch of salt

Mint Buttercream
2 and 1/2 cups icing sugar
1/2 cup butter
4 tablespoons whipping cream
2 teaspoons vanilla
1 teaspoon peppermint extract
1/2 teaspoon salt

In a large bowl, beat butter and both sugars for a few minutes until crumbly.  Beat in egg until incorporated.  Add in vanilla, malt vinegar and food colouring and mix well.  In a separate bowl, whisk together the flour, cocoa, baking powder, baking soda and salt.  Add half of the flour mixture and half of the buttermilk to the red mixture and beat in until well blended.  Add in the remaining flour mixture and buttermilk and mix.

On a baking sheet lined with greaseproof paper, drop the dough with a spoon at least 2 inches apart - about a tablespoon for large pies and half for smaller ones.  Bake in a preheated oven at 200 degrees Celsius for about 8-10 minutes.  Prepare the frosting while the cakes cool on a rack.  Makes approximately 20 cakes.

In a large bowl beat butter and sugar until crumbly.  Beat in cream, vanilla, peppermint and salt until smooth.  Once the cakes have cooled, turn half of them over (match up similar sized cakes in pairs) and either spread the frosting or pipe it onto the cake.  Smoosh (a very technical term) a topper on and roll the edges in crushed candy cane.  

Eat up!

Thursday, 6 December 2012

Ginger Snaps That Don't Snap!

I've done it!  I've actually started my Christmas baking ahead of schedule.  My usual, wait until a week before Christmas and pound out as many different types of cookies in one day while turning the kitchen into a scene from a disaster movie and staying up till 3am to get that last batch done and wipe the icing sugar off the cupboards (leave the stuff on the ceiling till morning) so as not to infuriate the husband, routine will not be happening this year.  Finally.  Though it feels a little strange starting the baking without any decorations up in the house (meet the seven little reasons why I can't put my tree up yet here).

I like to give out tins of cookies to friends and family as a way of spreading the joy.  Plus, I love to bake.  But I also love to eat and the fella doesn't exactly have a sweet tooth so I'm left to enjoy the Christmassy goodness all by myself (I know, poor me - but folks, my gym closes for 2 weeks over the holidays, so you see my problem here).  The tins are always returned empty so I must be doing something right, or my people just ain't that picky.  I'll let you decide for yourself.  I'll post my adventures in Christmas baking as I go along and let me know what you think if you try any of the recipes.  You can also just let me know what your thinking, about anything really, unless it's creepy - keep that to yourself.

So, to kickstart the baking bonanza I give you ginger snaps, that don't snap.


I got this recipe from my mother, who says she adapted from Better Homes and Gardens.  These are cookies she made for us while growing up.  I have to be honest here, I didn't really like them.  I wasn't a huge fan of molasses and they were always very hard to bite into.  But my palate has developed since then and I have also found that when I make these cookies, they never snap.  They always stay chewy, even after having been in the freezer for awhile (this batch makes a lot and I always have some left come January - I'm not really talking these up here, am I?  They're good, I swear!).  I was trying to figure out what I might be doing differently to make them stay chewy and discussed my thoughts with my mother.  I thought it could be the sugar I was using, my mother says my house is damp.  I get it, it rains a lot here (it's chucking it down as I type).  And I like them on the chewy side.  But here's an experiment:  if you make these cookies, report back here and tell me where in the world you made them and are they snappy or chewy.  In the meantime, I'm off to turn up the heat and dry out my maison.  Shh, don't tell my husband.

Ginger Snaps (that don't snap) yields 4 dozen  
Adapted from my mother who adapted from Better Homes and Gardens

3/4 cups butter
2 cups granulated sugar
2 eggs
1/2 cup black treacle (molasses)
2 teaspoons vinegar (I used malt)
3 and 3/4 cups flour
1 and 1/2 teaspoons baking soda
pinch ofground cloves
2 teaspoons ground ginger
1/2 teaspoon cinnamon
pinch of pepper (my mom's addition; I didn't have any today)

Sidebar: my cheapy mixer decided to hold all of the butter between the beaters and forced me to go old skool and use a wooden spoon.  Good thing I got that little upper body workout because I had to do a fair bit of taste testing (for chewyness).

In a large bowl, beat butter with a hand mixer (or wooden spoon).  Add in the sugar a little at a time and beat in with butter.  Stir in slightly beaten eggs and vinegar and then mix in the treacle.  In a separate bowl, whisk together flour, baking soda and spices.  Then, while stirring the wet mixture with a spoon, blend in the flour mixture a little at a time until everything has combined.

Roll dough into similar sized balls and roll in white sugar.  Place at least 5cm apart on baking tray and bake for 8-10 minutes at 200°C.

Tip from my mom:  weigh each ball of dough to achieve cookies of the same size.  I did most of these at 30 grams each but 20 grams made nice bite size cookies (perfect because you can eat more!) 


20 grams to the left and 30 on the right

Wednesday, 5 December 2012

Bah-Humbug Steak and Ale Pie

Favourite pub food, hands down, is steak and ale pie!  There's nothing I love better (well, that's a lie...I love a lot of things and people, yes people too) than sitting in a warm pub, near an open fire, with a pint and a hot steak and ale pie, oh and with the husband too.  But let me one up that.  Being able to recreate all of that while wearing comfy pants?  H-E-double-hockey-sticks YES!

I made mine with this Bah-Humbug Ale in honour of my Grinch husband, who holds my Christmas decorations hostage in the attic until he sees fit to have them out (they're too tricky to get down on my own - and there are spiders up there).


Don't let the idea of making pastry put you off.  I have made pastry in the past (and it turned out not too bad I might add) but purely for cost and ease I buy the ready made stuff.  The cost of butter is near enough the cost of ready made pastry and it saves time and effort.  Something I learnt in teaching: decide on your objective and take the steps needed to achieve it.  If your ultimate goal is to make pastry from scratch then, by all means, go for it!  But if what you want is a homemade (bar the pastry) steak and ale pie, then cheat away.  Jamie Oliver does!

I used Jus Rol but many grocery stores do their own version. 


I cooked the filling in a large casserole dish (I love my Le Creuset dish - made possible by generous wedding guests, thanks peeps!)  and then divided it among two dishes for individual pies.  This can be made in a large pie dish or lasagna pan and cut into slices to feed a larger crew.  I like to use mushrooms to bulk out the meat (and I like mushrooms - the hubs, not so much). 


Here's a tip - If you don't need all of the pastry, cut the chunk in four and freeze any unused sections (according to packet directions).  I used a quarter section for each pie.  I rolled out my ready-made pastry, draped each sheet over the individual dishes and brushed a little milk on them.


They were in the oven for about 20 minutes.  And then, with a fire roaring and snuggled in my comfy pants (actually I think I was in full on pyjama mode, the ones with little doggies on them) we feasted!  Plates were cleared (except for a few unwanted mushrooms from a certain so and so).


Steak and Ale Pie serves 2 (double or triple on up to feed more!)
350g of stewing steak
6-8 mushrooms, quartered
1 small onion, finely chopped
2 cloves of garlic, sliced thinly
1 tablespoon of cornflour/cornstarch
splash of Worcestershire sauce (even though I know how to pronounce this I always say worse-esther-sher-shiiire sauce)
beef stock cube made according to directions
1 bottle of delicious ale

Brown the meat in a frying pan and then transfer to a casserole dish.
Saute the onions for a few minutes and add the garlic just as the onions begin to brown and fry for a further minute or so.  Add to the casserole dish.
Taste test the ale. (that's a very important step!)
Add mushrooms, a splash of W-sauce, the stock and ale (hopefully you haven't tested the whole bottle)
Top up the casserole dish with water so that all of the contents are covered.  The mushrooms will float ;)

Cover and cook at 180°C for about 2 hours or until meat falls apart and sauce has thickened.  Transfer to individual dishes or pie plate, cover with rolled out pastry, cut a little vent, brush a little milk and cook for a further 20 minutes, bringing the temperature up to 200°C.

Tell me, What is your favourite pub grub?  How are you kicking off the Christmas season?  When will you start decorating?  And don't tell me you started in November...

ShareThis